
Updated for version 1.0.0
Introduction
This document provides a quick guide to using the One Sightsolutions Niagara ossBatchFacets software.
Requirements
It is assumed that the user is trained in the use of Niagara 4.
The ossBatchFacets software is only compatible with Niagara versions 4.8 or later.
You must read the End User License Agreement before using this software.
Installation
First install the OSS Batch Facets software modules and ensure you have a valid license from One Sight Solutions installed.
Please contact One Sight Solutions to obtain the software or a license: sales@onesight.solutions
Start the Niagara Workbench and open the OSS Batch Facets palette which contains the ‘OssBatchFacetEditor’ component.
Login to the Niagara station and drag the ‘OssBatchFacetEditor’ component from the palette to anywhere in the Config section of the station (or sub-folders).
Using the ossBatchFacets Editor
Searching For Points
Once the OssBatchFacetEditor component has been installed on the station double click it to view the Points Selection Manager.
Click on the Find Points button at the bottom of the manger view.
A Set Point Filter dialog window will open where you can choose options for selecting a sub-set of the points on the station, either by location, name or type.
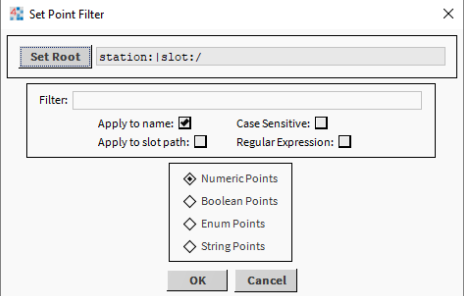
Clicking on the Set Root button opens a component tree view where a node can be selected to restrict the search to only points below this node. If no node is selected then the whole station will be searched for points.
The Filter text entry box allows the user to restrict the points found by name (or path). Only points that have the chosen text in their name or path (depending on the options selected) will be discovered.
The last section allows the user to select the type of points to be found. Only one type can be selected at a time as the type of facets that are appropriate for each type of point are different.
Once the required filter options have been chosen clicking the OK button will start the point search.
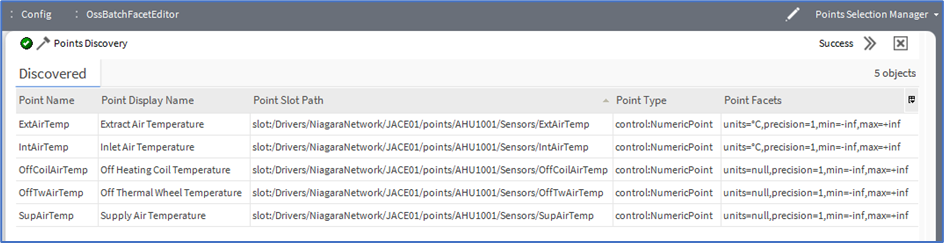
A job bar at the top of the manager view will show the search progress.
When the search job is complete the manger discovery table will show the list of the points that were found to match the filter:
Selecting Points
After points have been found and displayed in the manager view discovery table these can be selected individually or the Select All button at the bottom of the view will select all points found.
Setting The Point Facets
Once the user has selected all the points that they wish to set the facets for they can click the Set Facets button at the bottom of the manager view.
A Set Point Facets dialog window will open where the user can select the facets that they wish to apply to all the points they have selected.
When the facets have been set-up clicking the OK button will start a point facet assignment job that will set the facets on the points. The progress of this job is shown in the job bar at the top of the manager view.
If the Cancel button is clicked on the facet selection dialog then no point facets will be changed.