Updated for version 1.0.0
Introduction
This document provides instructions on how to install and use the One Sight Solutions ossEasyMQTT Niagara module.
Requirements
It is assumed that the user is trained in the use of Niagara 4 and is familiar with the use of MQTT.
You must read the End User License Agreement before using this software.
The ossEasyMQTT software is only compatible with Niagara versions 4.10 or later.
This software supports MQTT version 3.1.1 which is backward compatible with MQTT brokers that support MQTT version 5.0.
If SSL (TLS) connections are used then only TLS version 1.2 is supported.
Installation
Niagara Software Module Installation
Before the ossEasyMQTT software can be used, the Niagara software modules must be installed on the user’s PC and the target host.
The two software module files supplied by One Sight Solutions must be installed on the host using the Niagara platform software manager:
• ossEasyMqtt-rt.jar
• ossEasyMqtt-wb.jar
These software files must also be installed in the appropriate Niagara modules directory of any PC on which you intend to access the ossEasyMQTT software.
Niagara Software Licensing
The host running the ossEasyMQTT software must be licensed by One Sight Solutions before it will operate correctly.
The following information is required to generate the ossEasyMQTT license:
• Niagara host identifier (e.g. Qnx-TITAN-0000-XXXX-XXXX).
• Niagara host serial number.
Please send this information to One Sight Solutions: sales@onesight.solutions
It is recommended that the license is installed on the Niagara host using the platform license manager import capability to download the license directly from the Niagara license server over the internet. If it is not possible for the host to download the license from the internet then One Sight Solutions can supply the necessary license files which can be installed manually.
Ensure that the One Sight Solutions certificate is also installed, so the Niagara platform license manager should show both of the following files:
• OneSightSolutions.license
• OneSightSolutions.certificate
The host should reboot during the license installation process.
Platform DNS Configuration
For the ossEasyMQTT software to make network connections using named web sites it requires that the host has a valid DNS server assigned. This is not required if only IP addresses are being used.
This might be an internal DNS server or an external one such as Google (8.8.8.8).
To ensure that your platform has a DNS server set up go to ‘Platform->TCP/IP Configuration’ and look for the correct interface (i.e. the network connection you are using) and ensure the DNS servers property has a valid value, see Figure 1.
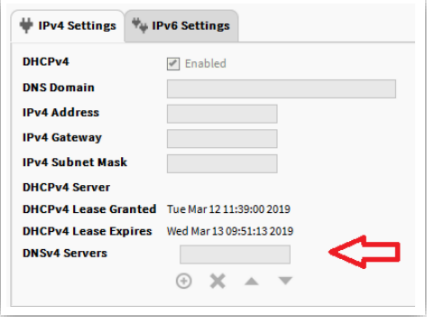
Please contact your network system administrator if you are unsure if this is configured correctly.
Getting Started with the ossEasyMQTT component
The following is an introduction to using the ossEasyMQTT client.
Set up a MQTT Broker connection
First open the ‘ossEasyMQTT’ palette.
Drag the OssMqttService component from the palette into the Niagara station services folder.
Then drag a MqttBroker component from the palette into this OssMqttService container.
Go to the property sheet of this new MqttBroker component and expand the Connection section so you can see the connection properties, as shown in Figure 2.
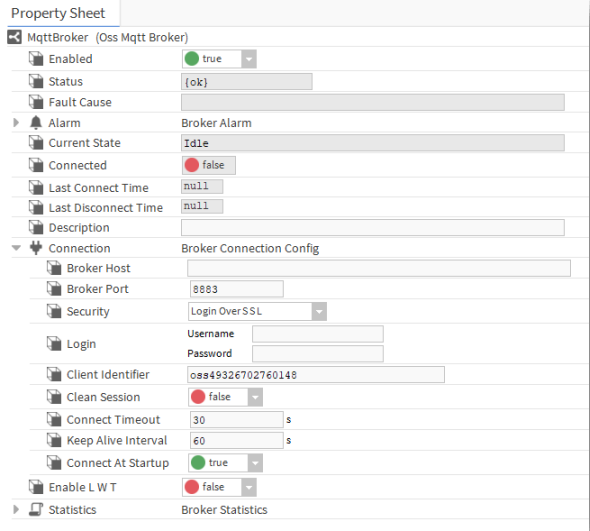
Enter the address the of the MQTT broker host.
Remember that you will need to set up the DNS server if you are not using numeric IP addresses (as described in ‘Platform DNS Configuration’).
Make sure you have the correct broker port value as it may change according to the credential option you choose.
The credential options are:
• Anonymous
• Anonymous Over SSL
• Login
• Login Over SSL
• Certificate
Select the appropriate option for your MQTT broker and click refresh to ensure the available properties are updated.
Enter the required credentials for the chosen option (e.g. username and password).
Run the ‘Connect’ action on the MqttBroker component and wait for the software to connect to the MQTT broker server.
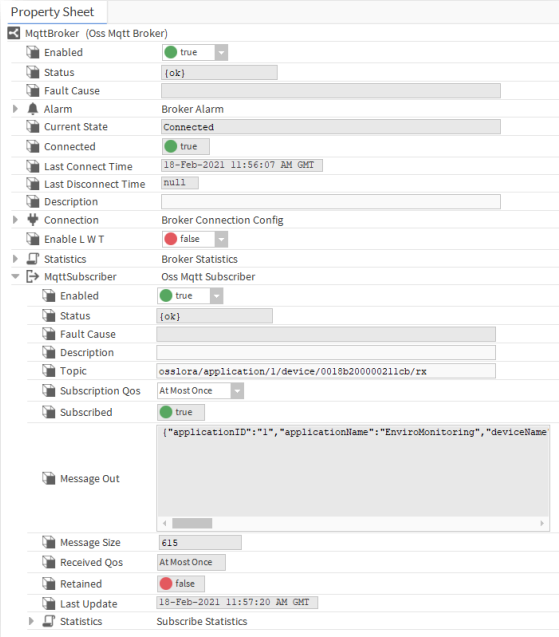
Set up a MQTT Subscriber
Drag a MqttSubscriber component from the palette into the MqttBroker container.
Enter the MQTT topic for the data you want to access into the subscriber topic property.
Run the ‘Subscribe’ action on the MqttSubscriber component.
Any data that is published to that topic on the broker will now appear in the ‘Message Out’ property.
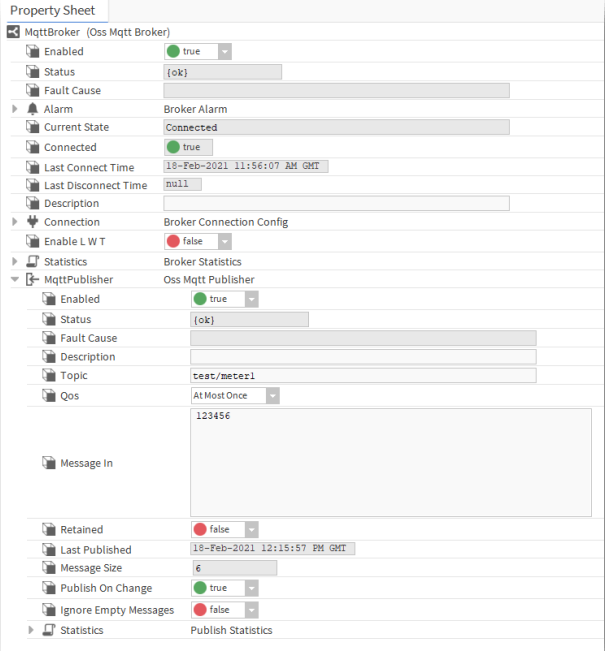
Set up a MQTT Publisher
Drag a MqttPublisher component from the palette into the MqttBroker container.
Enter the MQTT topic for the data you want to publish to into the publisher topic property.
Data entered into the ‘Message In’ property will now be sent to the specified topic on the broker.
By default data will be published whenever the ‘Message In’ property changes.
But publishes can be sent manually by setting the ‘Publish On Change’ property to false and using the MqttPublisher ‘Publish’ action.