
Updated for version 2.0.8
Introduction
This document provides instructions on how to install and use the OSS Easy API web client module.
This module enables access to numerous web API data services from Niagara supervisors and JACEs.
Requirements
It is assumed that the user is trained in the use of Niagara 4 and is familiar with the use of web APIs.
The OSS Easy API software is only compatible with Niagara versions 4.10 or later.
You must read the End User License Agreement before using this software.
Installation
Niagara Software Module Installation
Before the OSS Easy API software can be used, the Niagara software modules must be installed on the user’s PC and the target host.
The ‘ossEasyAPI-rt.jar’ file supplied by One Sight Solutions must be installed on the host using the Niagara platform software manager.
This software file must also be installed in the appropriate Niagara modules directory of any PC on which you intend to access the OSS Easy API software.
Niagara Software Licensing
The host running the OSS Easy API software must be licensed by One Sight Solutions before it will operate correctly.
The following information is required to generate the OSS Easy API license:
- Niagara host identifier (e.g. Qnx-TITAN-0000-XXXX-XXXX).
- Niagara host serial number (if the host is not a supervisor).
Please send this information to One Sight Solutions: sales@onesight.solutions
It is recommended that the license is installed on the Niagara host using the platform license manager import capability to download the license directly from the Niagara license server over the internet.
If it is not possible for the host to download the license from the internet then One Sight Solutions can supply the necessary license files which can be installed manually.
Ensure that the One Sight Solutions certificate is also installed, so the Niagara platform license manager should show both of the following files:
- OneSightSolutions.license
- OneSightSolutions.certificate
The host should reboot during the license installation process.
Platform DNS Configuration
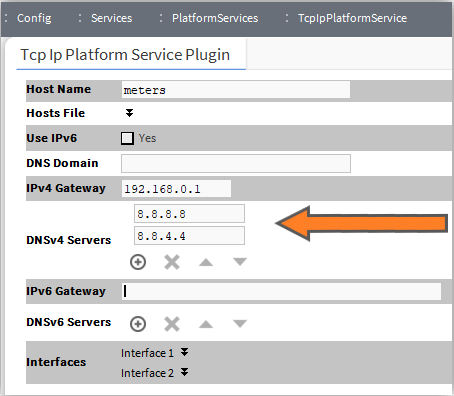
For the OSS Easy API software to make network connections using named web sites it requires that the host has a valid DNS server assigned. This is not required if only IP addresses are being used.
This might be an internal DNS server or an external one such as Google (8.8.8.8).
To ensure that your platform has a DNS server set up go to the Platform TCP/IP Configuration and look for the correct interface (i.e. the network connection you are using) and ensure the DNS servers
property has a valid value.
Niagara Supervisors will usually have this already set as part of the operating system configuration.
But JACE hosts will have to be configured in the Platform Services as shown in Figure 1.
Please contact your network system administrator if you are unsure if this is configured correctly.
Getting Started with ossEasyAPI
The following is a basic introduction to using the OSS Easy API Request component.
First open the ‘OSS Easy API’ palette.
Drag the ApiRequest component from the palette onto a wire-sheet.
Go to the new ApiRequest component property sheet.
The Api Url property should be set to the API web address, for example:
https://www.metaweather.com/api/location/44418The Http Method for APIs is commonly a simple HTTP GET request, so can usually be left as the default value of ‘Get’. But this may need to be changed for more complex API requests, especially those requiring authentication.
The documentation for the web API you are using will explain any authorisation required to make requests. Authorisation information may need to be supplied in the URL, HTTP POST body data or in HTTP header fields. The ApiRequest ‘Authorisation’ property only controls how HTTP header authorisation is handled.
Some web APIs require HTTP headers to be added for the web API server to understand the request.
These should be described in the API documentation.
The ApiRequest ‘Automatic Update’ field is set to false if API requests are being made using the ‘Send Request’ action. If this is set to true then regular requests will be made automatically, controlled by the ‘Update Period’ property. (Start with this as false until you are sure the request is working correctly).
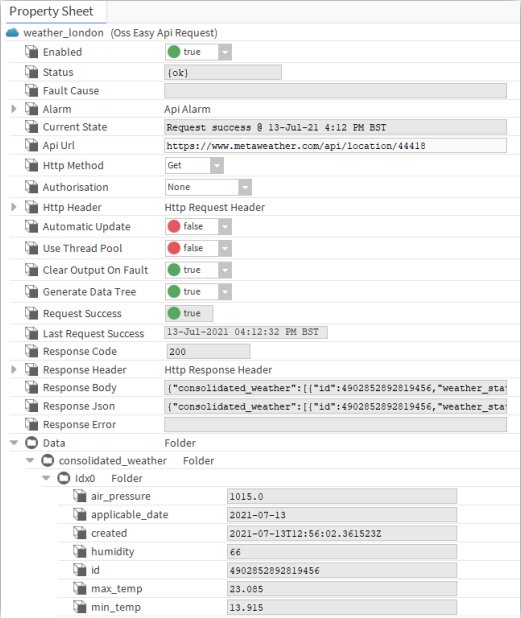
If a request is successful then the Response Body property will be set to the received response text and the Last Update property will be updated with the time the valid response was received. If the response was valid JSON data then the Response Json property will contain the JSON data. If the request was not successful then the Request Success property will be set to false and the Response Code property will contain an error code. The Response Error property will often contain some text indicating the cause of the failure.
If the response contains JSON data then a set of new properties will be added to the end of the ApiRequest component containing the JSON fields and arrays (the ‘Data’ tree). These properties can then be used to link to other components, (usually using the Niagara composite feature).
An example API request property sheet is shown in Figure 2.
ossEasyAPI Palette
Figure 3 shows the OSS Easy API palette.
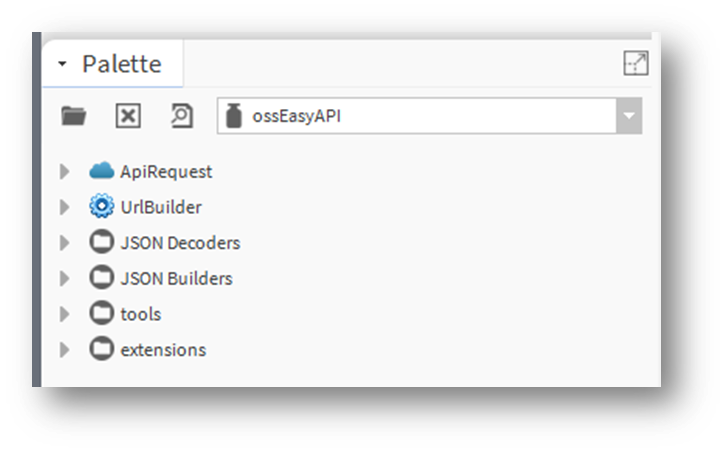
Table 1 has a brief description of each item in the palette.
| Component | Function |
| ApiRequest | The main component that is used to make HTTP API requests. |
| UrlBuilder | A component to make it easier to construct API URLs. |
| JSON Decoders | A collection of JSON decoding components. |
| JSON Builders | A collection of JSON construction components. |
| tools | General tools. |
| extensions | Extensions. |
ApiRequest Component Reference
This section describes each property of the ‘ApiRequest’ component in more detail.
Alarm
If the alarm is enabled then an alarm will be generated whenever the API request component goes into fault (e.g. connection failure). Properties are provided so the alarm class, source name and fault message can be configured.
Api Url
The ‘Api Url’ property should be set to the web API endpoint URL, as described in the API
documentation.
The following are examples:
- https://www.metaweather.com/api/location/32997
- https://api.tfl.gov.uk/line/mode/tube/status
- http://api.example.com:9123/device123/temp
- http://131.16.1.35/latest
- http://131.16.1.35:987/api/v2/user654/status
OSS Easy API supports both HTTP and HTTPS requests (i.e. SSL/TLS).
Http Method
The ‘Http Method’ property specifies what type of HTTP request is used to access the web API URL.
This is usually specified in the web API documentation, but the default value of ‘Get’ is the most common.
The other values: ‘Post’ and ‘Put’ are used when data needs to be sent to the API in a ‘Http Body’ property. What needs to be put in the body will be described in the API documentation. The ‘Delete’ option should only be used when specifically described by the API documentation.
Authorisation
The ‘Authorisation’ property controls what authorisation information will be sent in the HTTP header.
Note that there are other mechanisms for specifying authorisation information (in the URL or POST data), but this property only controls those that use the HTTP header.
If the Authorisation property is set to ‘Basic Auth’ then the request will use HTTP basic authorisation.
Refresh the property sheet and properties for a username and password will appear. These credentials will be included in an HTTP authorisation header entry as defined in RFC 7617.
If the Authorisation property is set to ‘Bearer Token’ then the request will use Bearer
Authentication. Refresh the property sheet and a property for the bearer token value will appear.
This bearer token will be included in a bearer authorisation header entry.
If the Authorisation property is set to ‘None’ then no HTTP authorisation headers will be added.
Http Header
The ‘Http Header’ section allows the user to specify additional HTTP header entries.
Use the ‘Add Header Entry’ to add a header property to the section, entering the header key for the name. This will appear as a string property inside the header section and the user can enter the header value manually or link to the property from another component.
If a header property is no longer required it can be removed with the ‘Remove header Entry’ action.
Http Cookies
Within the ‘Http Header’ section there is a ‘Http Cookies’ section which allows the user to specify HTTP cookie entries.
Similar to the Http Header section, cookie entries can be added and removed using actions and each entry appears as a string property with a value that can be set manually or using a link.
Body Property
The ‘Body Property’ allows the definition of the body value that will be sent with the POST or PUT request types. This property is not normally visible unless the Http Method property is set to ‘Post’ or ‘Put’.
The value of this property is sent unprocessed, but is only suitable for UTF-8 text values, (e.g. JSON data).
Note that if form data is being sent then it should all be on one line, with parameters separated with an ampersand, for example:
param1=value1¶m2=value2Automatic Update
If the ‘Automatic Update’ property is false then a request will only be issued when the ‘Send Request’ action is invoked.
If the property is true then the request will be repeated periodically as defined by the ‘Update Period’ property.
Update Period
The ‘Update Period’ property specifies how often requests are sent when the ‘Automatic Update’ property is true.
This property is only visible when the ‘Automatic Update’ property is true. After setting the ‘Automatic Update’ property to true refresh the property sheet to see the Update Period property.
Use Thread Pool
The ‘Use Thread Pool’ property controls how system resources are used when making API requests.
If the ‘Use Thread Pool’ property is false then all resources required to make an API request will be loaded into memory on start-up to ensure that requests are processed as quickly as possible.
If the ‘Use Thread Pool’ property is true then the resources required to make an API request will only be loaded into memory when the request is made.
It is normally best if this value is left at the default value of false.
But, if an application is experiencing problems with memory usage, for example when a large number of separate API request components are installed on a JACE, then it can be useful to be able to reduce the memory usage of some components that are not frequently used (e.g. those making authorisation requests).
Clear Output On Fault
When the ‘Clear Output On Fault’ property is false and an API error occurs the response body and JSON properties will retain the value they had before the fault.
If the ‘Clear Output On Fault’ property is set to true, the response body and JSON properties will be set to empty strings when an API fault occurs.
Generate Data Tree
If the ‘Generate Data Tree’ property is set to true, when valid JSON data is received the ‘Data’ property will be added (or updated) with a slot structure representation of the JSON data.
If the ‘Generate Data Tree’ property is set to false then the ‘Data’ property will not be created.
This option is often useful to reduce memory usage when response data is being processed directly (e.g. JSON data being manually decoded using other tools).
Note that if the value is false then the ‘Data’ property will not be deleted, the user must manually delete the slot if it is not required (e.g. to save memory usage when large data payloads are returned).
Request Success
The ‘Request Success’ read-only property will be set to true if an API request has succeeded or false if the last request failed.
Note that this state only refers to the success of the API request. If an API request is successful but the response data is not JSON then this property will still be set to true, but the response JSON property will not be updated.
Last Request Success
The ‘Last Request Success’ read-only property will be set to the time of the last successful API request.
Response Code
The ‘Response Code’ read-only property will be set to the HTTP response code returned from the last API request.
This will usually have a value of 200 for a successful request and a value of 401 if the request is unauthorised. A list of common HTTP response codes can be found at this link.
Response Header
The ‘Response Header’ section will contain a set of read-only properties that represent the entries in the HTTP response header returned from the latest API request.
Within this section is also a ‘Response Cookies’ section which will contain any cookie data returned in the HTTP response header.
Response Body
The ‘Response Body’ read-only property will be set to the raw HTTP response body, without any conversion.
Response Json
If an API request returns valid JSON data this will be put in the ‘Response Json’ read-only property.
Response Error
If an API request results in an error response any error response data will be put in the ‘Response Error’ read-only property. This may be blank if the server has not returned additional error information, in this case the Response Code will determine the fault.
Data
The ‘Data’ property is created dynamically to represent any valid JSON data that is extracted from a successful API response.
Properties are created that best represent the JSON data with attribute-value pairs being converted to Niagara properties with values and arrays being converted to an enumerated list of Niagara properties with a name prefixed by ‘Idx’.
It is recommended that the Niagara composite function is used to map any data fields that are generated to top-level component properties when these are to be linked to other components.
Refer to ‘Creating a Data Composite’ for instructions on adding composites.
Send Request
The ‘Send Request’ action is used to send a web API request as defined by the component properties.
Processing JSON Response Data
Using the Data Tree
The API request component can retrieve any type of textual data from an API, but has additional features for processing JSON data responses.
The most obvious mechanism for handling JSON data payloads is using the Data tree which is automatically constructed by parsing the JSON data key-pairs into properties.
When using property values from this Data tree it is often more convenient to use the Niagara composite function to make the values available on the top level of the request component.
Creating a Data Composite
To create a composite from a JSON response value you first right click on the API request component. Near the bottom of the menu that appears is a Composite entry, click that.
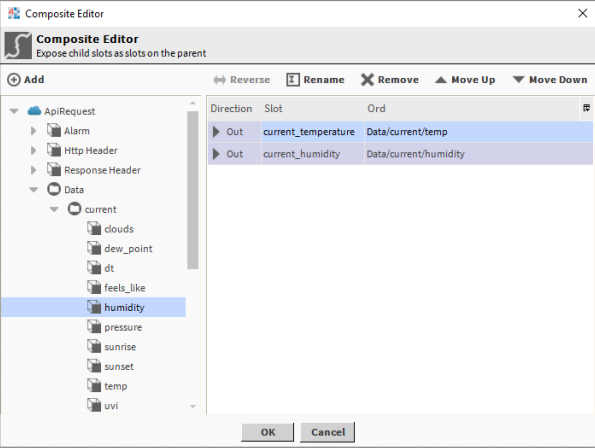
In the Composite Editor window that opens expand the nav-tree on the left section until you reach the value you wish to use. Select that value and click the ‘Add’ button at the top of the left pane.
This will transfer the value to the list of composites in the right-hand section. If you wish to set the name that the property will appear as at the top level you can rename it here by selecting the entry on the right section and clicking the ‘Rename’ button at the top of the right-hand pane.
When you have arranged all the data fields you wish to access click OK at the bottom of the windows to create the composites.
An example of the Composites editor window is shown in Figure 4.
Using the JSON Decoding Tools
Sometimes it is easier or more efficient to extract data from a JSON response using the provided JSON decoding tools.
These tools can be found in the JSON Decoders folder in the OSS Easy API palette.
Note that if the JSON payload is being decoded directly in this way then the Data tree generation can be disabled using the ‘Generate Data Tree’ property, which can save memory, especially if large JSON payloads are being received.
Open Weather Map JSON Decode Example
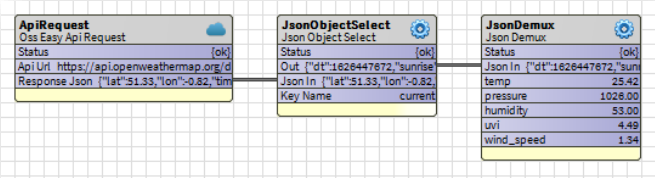
The following example uses JSON decoding components to extract the current temperature and humidity from the JSON data returned by the Open Weather Map API.
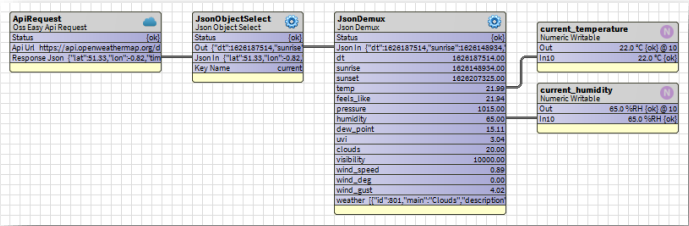
First a ‘JsonObjectSelect’ component is used to extract the data in the ‘current’ JSON object field.
This ‘current’ JSON object data is then passed to a ‘JsonDemux’ component that extract all fields from the object into Niagara properties.
Then the temperature and humidity property values can be linked to and used by other parts of the Niagara station, such as control logic or dashboard views.
TFL Road Status JSON Decode Example
The following example uses JSON decoding components to extract the congestion status of the A3 road from the JSON data returned by the Transport For London Road Status API.

A ‘JsonPath’ component is used to apply a JSON Path Query to the data provided by the API.
This uses the following query expression:
$.[?(@.url=='/Road/a3')].statusSeverityDescriptionThis query extracts the ‘statusSeverityDescription’ JSON field from an object in an array, where the object has a ‘url’ field that has the value ‘/Road/a3’.
This allows logic to be created that can extract data from a JSON array when the array data is not always in the same order, so using a fixed array index is not appropriate.
Refer to the JSON Path Query GitHub resource for more information on creating JSON Path expressions.
URL Builder
The API request URL property can be provided as a fixed value or linked from another component.
If there are elements of the URL that need to change the URL builder tool is provided in the palette to make it easier to link to those variable elements.
The URL builder tool works a bit like the standard kit controls String Concat component, but with additional features for handling URL queries.
An example is shown in Figure 7.
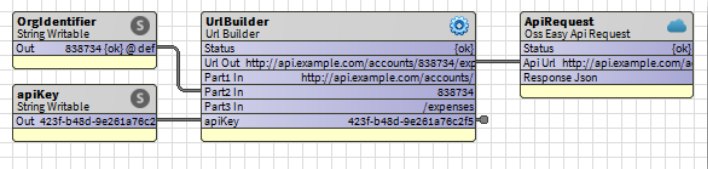
In this example an account identifier is being inserted into the main path of the URL and an API key is being added as a URL query parameter (made visible using the composite function).
JSON Decoders
JSON Decoders Overview
A set of components are provided to support decoding JSON API responses directly.
These tools can be found in the JSON Decoders folder in the OSS Easy API palette.
Examples of how to use these components are included in ‘Using the JSON decoding tools’.
Table 2 contains a brief overview of the different JSON handling functions:
| Component | Function |
| JsonObjectSelect | Extract a single element from a JSON object |
| JsonArraySelect | Extract a single element from a JSON array |
| JsonDemux | Extract multiple elements from a JSON object |
| JsonPath | Apply a JSON Path query to some JSON data |
| JsonTree | Generate a data tree from the provided JSON data |
Note that if the JSON payload is being decoded directly with these tools then the Data tree generation can be disabled using the ‘Generate Data Tree’ property, which can save memory, especially if large JSON payloads are being received.
JsonObjectSelect
The JsonObjectSelect component extracts a single value from a JSON object input.
The source JSON data is linked to the Json In property and the key name of the value that is required is entered in the Key Name property, then the Out property will be set to the JSON value extracted from the input.
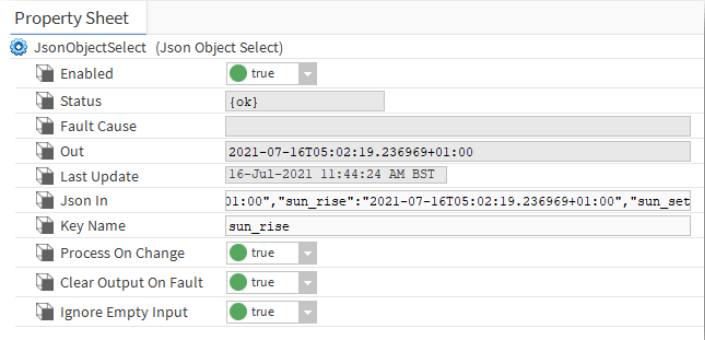
In the example shown in Figure 8 the value of the ‘sun_rise’ field is being extracted from the JSON input.
If the Process On Change property is true then the Out property will change whenever the Json In property changes. If this is set to false then the Out value will only change when the Decode Input action is run.
If the Clear Output On Fault property is set to true then if there is a fault (e.g. the specified Key Name is not present in the input JSON) then the Out property will be cleared. If this is set to false then the Out property will retain any previous value when a fault occurs.
If the Ignore Empty Input property is set to true then if the Json In property is empty then the component will take no action. If this is set to false then a fault will be generated if the Json In property is empty.
JsonArraySelect
The JsonArraySelect component extracts a single entry from a JSON array input.
The source JSON data is linked to the Json In property and the index of the required array entry is entered in the Array Index property, then the Out property will be set to the JSON element extracted from the array.
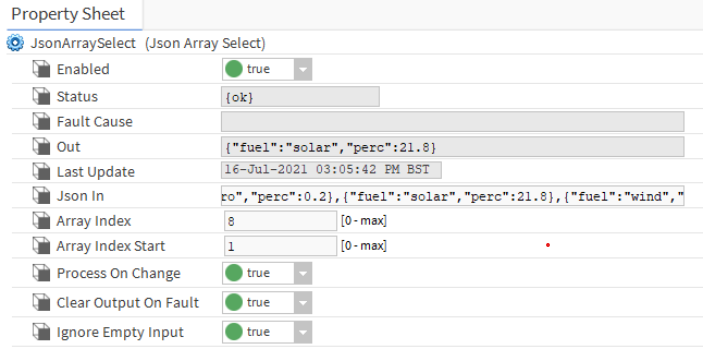
In the example shown in Figure 9 the item 8 in the input JSON array is being extracted. The result is another portion of JSON data which can be further decoded using the other JSON tools.
The Array Index Start property defines the index of the first item in the JSON array. Some numbering conventions may wish to start at zero and some start at one.
If the Process On Change property is true then the Out property will change whenever the Json In property changes. If this is set to false then the Out value will only change when the Decode Input action is run.
If the Clear Output On Fault property is set to true then if there is a fault (e.g. the specified index is outside the range of the input JSON array) then the Out property will be cleared. If this is set to false then the Out property will retain any previous value when a fault occurs.
If the Ignore Empty Input property is set to true then if the Json In property is empty then the component will take no action. If this is set to false then a fault will be generated if the Json In property is empty.
JsonDemux
The JsonDemux component extracts more than one value from a JSON object input.
The source JSON data is linked to the Json In property and the relevant elements of the JSON object are extracted and added to the component as slots or points (according to how it is configured).
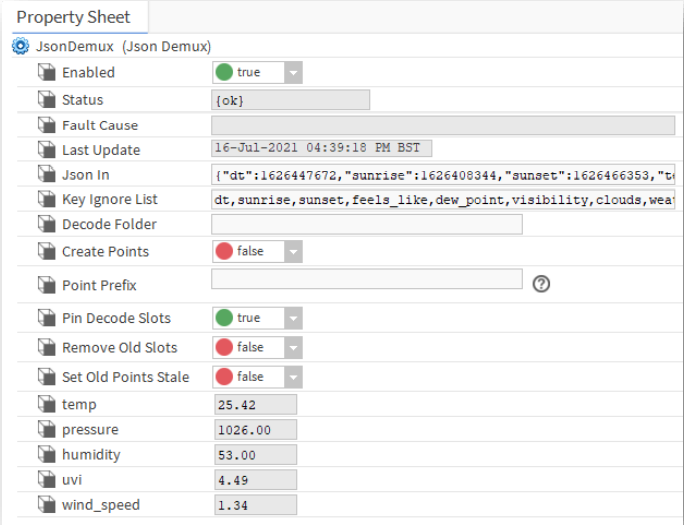
In the example shown in Figure 10 and Figure 11 the current weather data is being extracted from the JSON returned from a weather API. The JsonDemux ‘Key Ignore List’ property is being used to remove elements from the JSON object so that only the data that is required is extracted and used to create the property slots.
The Key Ignore List property is a comma separated list of JSON object key names that should be excluded from the decode, so property slots will not be created for these items.
The Decode Folder property defines a folder that will be created which will contain the generated property slots. If the property value is empty then no folder is created and properties are placed in the JsonDemux component.
If the Create Points property is false then Niagara property slots will be created. If the value is true then Niagara points will be created which can directly support history or alarm extensions. Note that any points created will not be automatically removed to ensure that no histories or alarms are accidentally deleted. The user must manually delete points if they are no longer needed.
The Point Prefix property is an identifier that will be automatically added to the beginning of any points created, this makes it easier to ensure the point names are unique if required. This is a BFormat property so can reference other component properties or attributes (e.g. the parent components name). Click on the question mark symbol for a description of BFormat usage.
If the Pin Decode Slots property is true then any property slots that are created will also be pinned, so they are visible on the wiresheet. If the value is false the properties will be created but not automatically pinned, so will not be visible on the wiresheet by default.
If the Remove Old Slots property is true then any property slots that have previously been created, but are no longer present in the input JSON will be removed. If this property is false then all slots will be retained. Note that if points are being created they will always be retained, even if this property is true.
If the Set Old Points Stale property is true and points are being created then any points that have previously been created but are no longer present in the input JSON will be given a stale status. If the data for those points reappears in the input JSON then the point status will go back to ok.
JsonPath
The JsonPath component extracts elements from JSON input data using a query.
The source JSON data is linked to the Json In property and the Path Expression is applied to that data and the result of the query is placed in the Out property.
The JSON query expression uses the JsonPath query language, for more details see the JsonPath GitHub page.
A full explanation of the capabilities of the JsonPath query language is beyond the scope of this document, please refer to the above JsonPath documentation.
An example of the use of this component is shown in ‘Using the JSON Decoding Tools’.
The JsonPath component provides a powerful tool for searching and extracting JSON data but care should be taken to monitor the Niagara system resource usage if a number of these components are being used in the same station, especially if the host is a JACE, or other platform with limited resources.
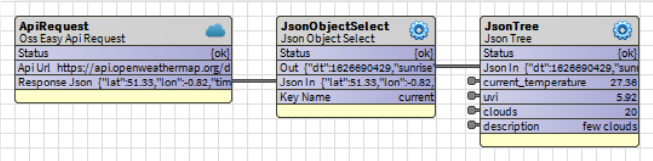
JsonTree
The JsonTree component generates a tree of properties that represent the value and structure of the JSON data input.
This works in the same way as the ‘Data’ tree that is generated by the ApiRequest component.
Having this function as a separate tool can be useful if an API returns a large amount of data, but only a small portion is required to be extracted. The other JSON decode tools can be used to extract the portion of data required and the JsonTree tool can then be used to extract the individual values.
This can be useful to save memory.
JSON Builders
JSON Builders Overview
A set of components are provided to support constructing simple JSON data structures when these are required to be sent to APIs (for example in POST or PUT requests).
These tools can be found in the JSON Builders folder in the OSS Easy API palette.
An example of how to use these components are included in section 10.10.
Table 3 contains a brief overview of the different JSON construction components:
| Component | Function |
| JsonBuilder | Top-level JSON builder component. |
| JsonObjectFolder | Component to represent a JSON object. |
| JsonArrayFolder | Component to represent a JSON array. |
| JsonNumeric | Component to represent a JSON numeric primitive. |
| JsonInteger | Component to represent a JSON integer primitive. |
| JsonBoolean | Component to represent a JSON Boolean primitive. |
| JsonString | Component to represent a JSON string primitive. |
| JsonEnum | Component to convert a Niagara Enum to a JSON primitive. |
JsonBuilder
The JsonBuilder component is the top-level container component for all other JsonBuilder components and provides the out slot that contains the resulting JSON text generated.
Generating JSON data must start with placing a JsonObjectFolder or a JsonArrayFolder component into a JsonBuilder component. This acts as the top-level JSON element, (i.e. either an object or an array) and the name of this top-level component is not used. This object or array component is then populated with sub-components to provide the JSON data required.
JsonObjectFolder
The JsonObjectFolder component represents a JSON object and should be placed in the JsonBuilder hierarchy wherever a JSON object is required. The child elements of the JSON object are then placed inside this component.
When not used as the top-level JSON element, or in an array the name of this component will be used as the JSON key of this element in the JSON data structure generated.
JsonArrayFolder
The JsonArrayFolder component represents a JSON array and should be placed in the JsonBuilder hierarchy wherever a JSON array is required. The child elements of the JSON array are then placed inside this component. It is the responsibility of the user to ensure the types of child elements are consistent.
When not used as the top-level JSON element, or in another array the name of this component will be used as the JSON key of this element in the JSON data structure generated.
JsonNumeric
The JsonNumeric component represents a JSON numeric primitive element and should be placed within a JsonObjectFolder or JsonArrayFolder component.
The JsonNumeric component property sheet is shown in Figure 13.
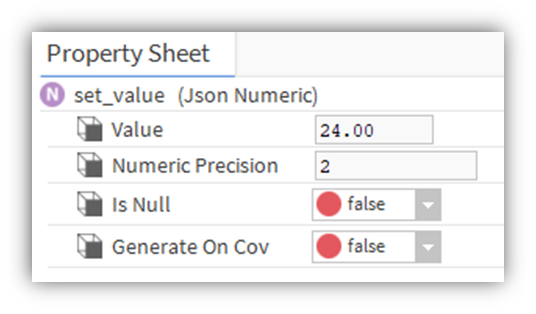
The ‘Value’ property is the numeric value that will be placed in the JSON data for this numeric primitive.
The ‘Numeric Precision’ property controls the maximum number of numeric digits that will be placed after the decimal point.
The ‘Is Null’ property controls whether the JSON primitive will be set to the JSON ‘null’ value instead of the numeric value.
The ‘Generate On Cov’ property controls whether the complete JSON data structure will be regenerated when the value property changes.
JsonInteger
The JsonInteger component represents a JSON numeric integer primitive element and should be placed within a JsonObjectFolder or JsonArrayFolder component.
The JsonInteger component property sheet is shown in Figure 14.
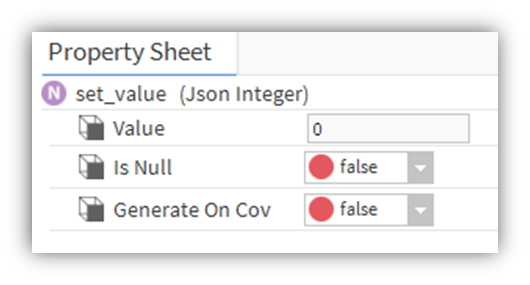
The ‘Value’ property is the numeric integer value that will be placed in the JSON data for this numeric primitive.
The ‘Is Null’ property controls whether the JSON primitive will be set to the JSON ‘null’ value instead of the numeric value.
The ‘Generate On Cov’ property controls whether the complete JSON data structure will be regenerated when the value property changes.
JsonBoolean
The JsonBoolean component represents a JSON Boolean primitive element and should be placed within a JsonObjectFolder or JsonArrayFolder component.
The JsonBoolean component property sheet is shown in Figure 15.
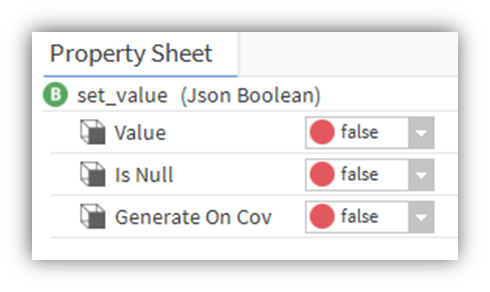
The ‘Value’ property is the Boolean value that will be placed in the JSON data for this Boolean primitive.
The ‘Is Null’ property controls whether the JSON primitive will be set to the JSON ‘null’ value instead of the Boolean value.
The ‘Generate On Cov’ property controls whether the complete JSON data structure will be regenerated when the value property changes.
JsonString
The JsonString component represents a JSON string primitive element and should be placed within a JsonObjectFolder or JsonArrayFolder component.
The JsonString component property sheet is shown in Figure 16.
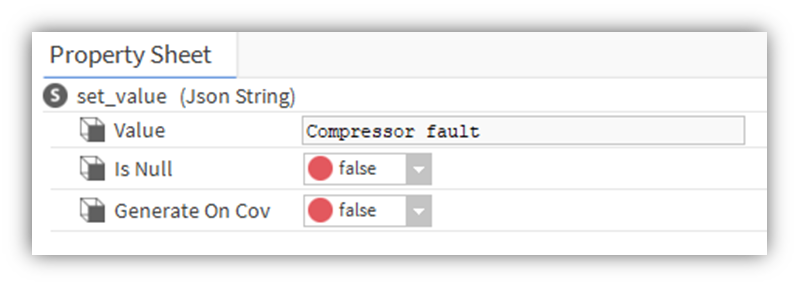
The ‘Value’ property is the string text value that will be placed in the JSON data for this string primitive.
The ‘Is Null’ property controls whether the JSON primitive will be set to the JSON ‘null’ value instead of the string value.
The ‘Generate On Cov’ property controls whether the complete JSON data structure will be regenerated when the value property changes.
JsonEnum
The JsonEnum component converts a Niagara Enum to an appropriate JSON primitive element and should be placed within a JsonObjectFolder or JsonArrayFolder component.
The JsonEnum component property sheet is shown in Figure 16.
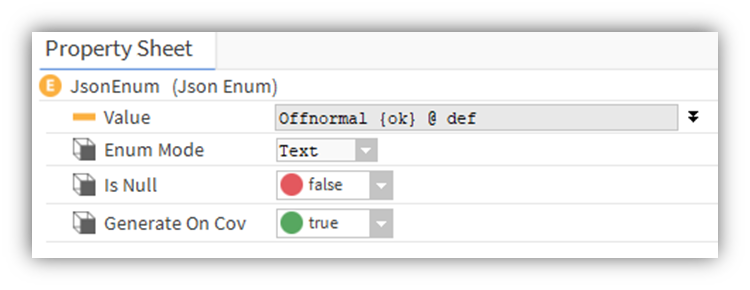
The ‘Value’ property is the Niagara Enum input which will be converted to a JSON value.
The ‘Enum Mode’ property controls how the input value is converted to a JSON value. Tag mode will convert the Enum to a JSON string as one word (camel case). Text mode will convert the Enum to a JSON string as multiple words (with spaces). Ordinal mode will convert the Enum to a JSON numeric integer that represents the Enum ordinal.
The ‘Is Null’ property controls whether the JSON primitive will be set to the JSON ‘null’ value instead of the converted value.
The ‘Generate On Cov’ property controls whether the complete JSON data structure will be regenerated when the value property changes.
JsonBuilder Example
An example of JsonBuilder usage is shown in Figure 18.
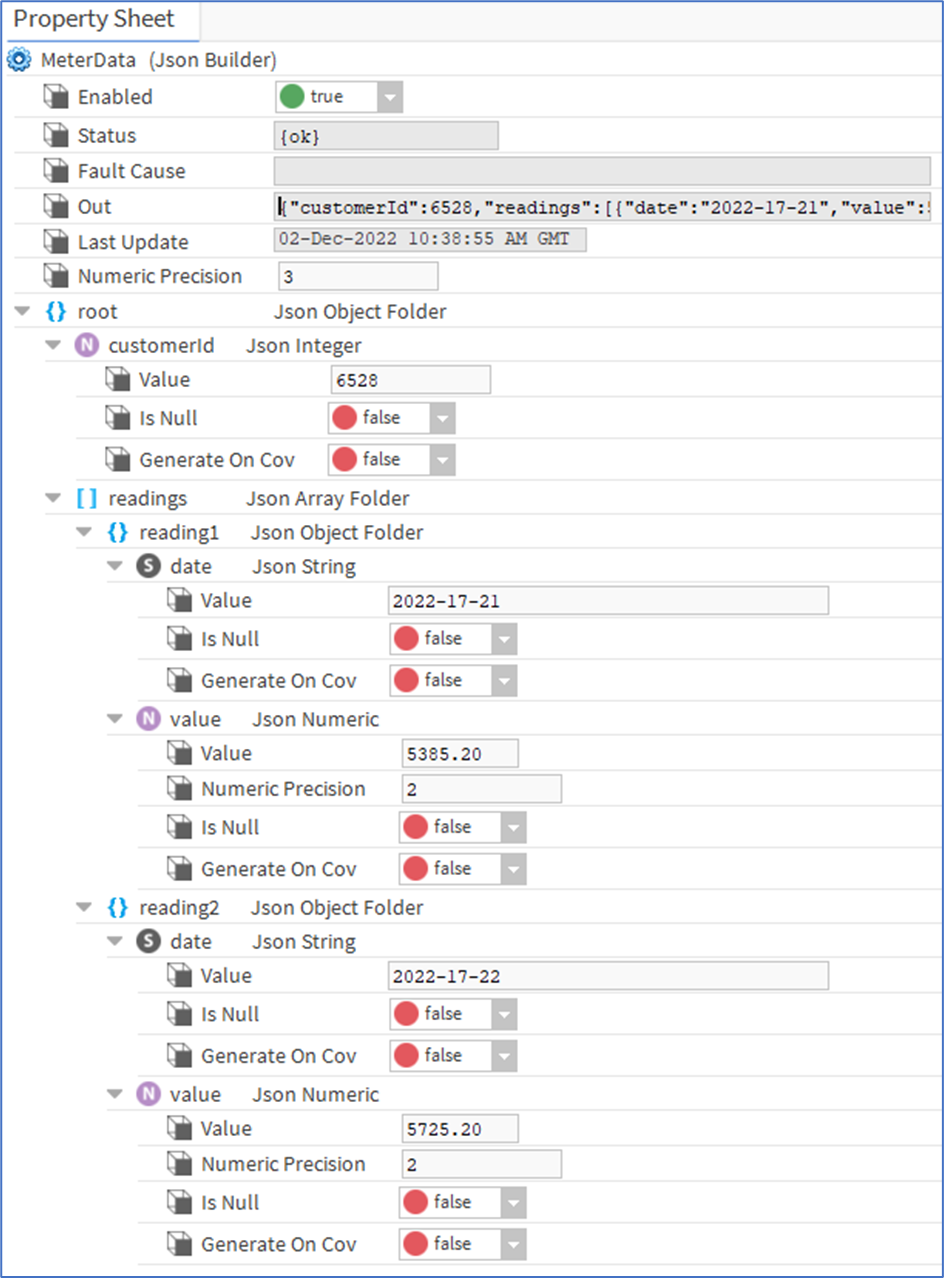
This JSON builder example will result in the following JSON data (when shown in ‘pretty-print’).
{
  "customerId": 6528,
  "readings": [
    {
      "date": "2022-17-21",
      "value": 5385.2
    },
    {
      "date": "2022-17-22",
      "value": 5725.2
    }
  ]
}
General Tools
General Tools Overview
A set of general tool components are provided to support various aspects of API access.
These tools can be found in the ‘tools’ folder in the OSS Easy API palette.
Table 4 contains a brief overview of the different tools components:
| Component | Function |
| Trigger | Tool for triggering actions on value changes. |
| TimeEncode | Convert a Niagara time to various formats. |
| TimeDecode | Convert an external time to various formats. |
| FileToString | Read the contents of a file into a string. |
Trigger
The Trigger component is used for triggering actions when values change.
For example this can be used to initiate an API request when a property value changes. The changes to the property can then be included in a post to an API endpoint to update a value on a server.
The property sheet of the Trigger component is shown in Figure 19.
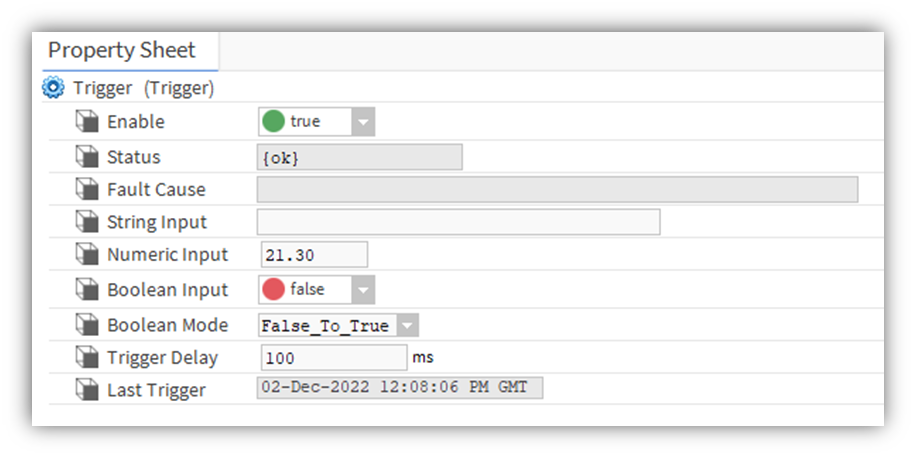
There are three input properties: ‘String Input’, ‘Numeric Input’ and ‘Boolean Input’.
If any of these properties change an ‘Output Trigger’ topic is fired.
The ‘Boolean Mode’ property controls what type of Boolean change will cause the trigger to fire: ‘False To True’, ‘True To False’ or ‘Any Change’.
The ‘Trigger Delay’ causes a delay from the input change to the output trigger being fired.
Time Encode
The TimeEncode component is used for converting a Niagara time, or the current time into other time formats, including a configurable time format.
The property sheet of the Time Encode component is shown in Figure 20.
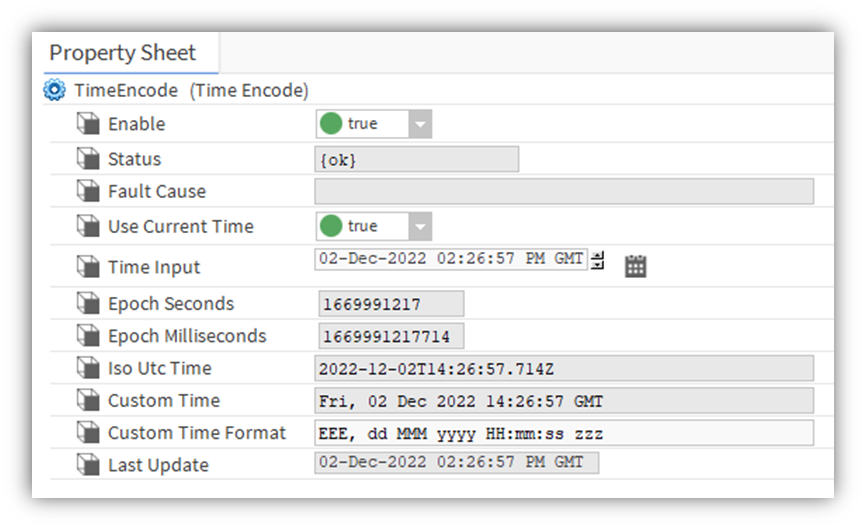
The source time can come from the ‘Time Input’ property, or if the ‘Use Current Time’ property is set to true then the current station time is used.
The output times are updated whenever the Time Input changes, or if the ‘Update’ action is run.
A number of standard time formats are provided, as well as a custom time format that is controlled using the ‘Custom Time Format’ property.
For information on how to configure the custom time format see definition of the Java SimpleDateFormat class.
Whenever the output times are updated the ‘Updated Trigger’ topic is fired, so other components can act on those changes.
Time Decode
The TimeDecode component is used for decoding an input time from standard or custom formats into alternative formats including native Niagara time.
The property sheet of the Time Decode component is shown in Figure 21.
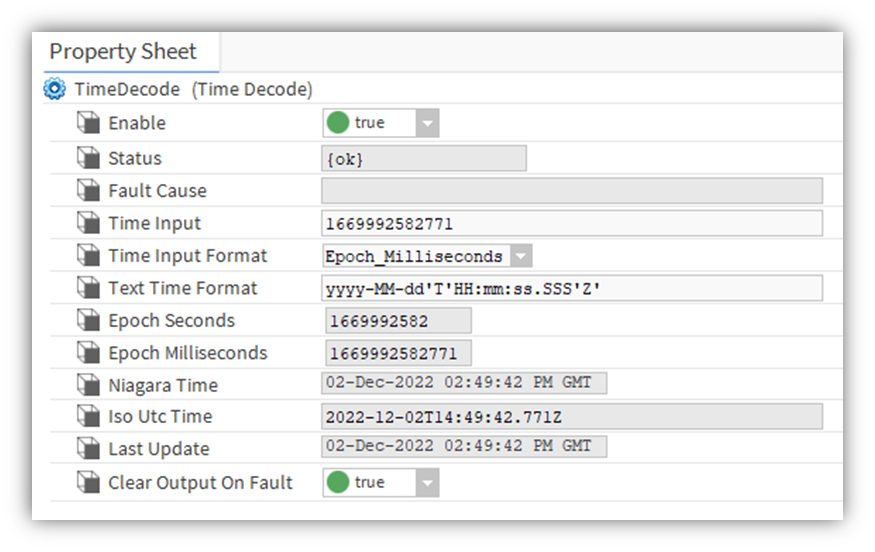
The ‘Time Input’ property should be set to the time string to decode.
The ‘Time Input Format’ property controls how the input time is decoded.
If the format is set to ‘Text’ then the ‘Text Time Format’ property is used to decode the input.
For information on how to configure the decode text time format see definition of the Java SimpleDateFormat class.
File To String
The FileToString component is used for reading the contents of a file and placing that in a string property.
The property sheet of the File To String component is shown in Figure 22.
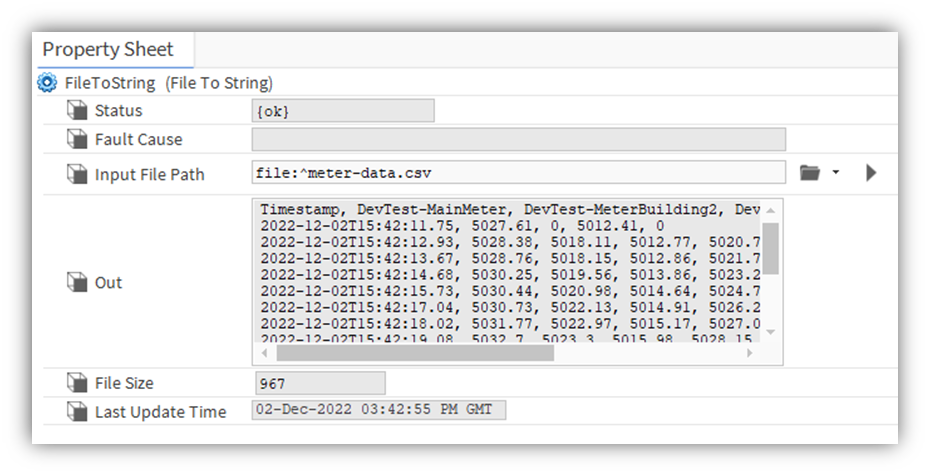
The ‘Input File Path’ property is used to select the file to read.
The ‘Out’ property contains the contents of the file.
The file can be re-read by running the ‘Update’ action.
Extensions
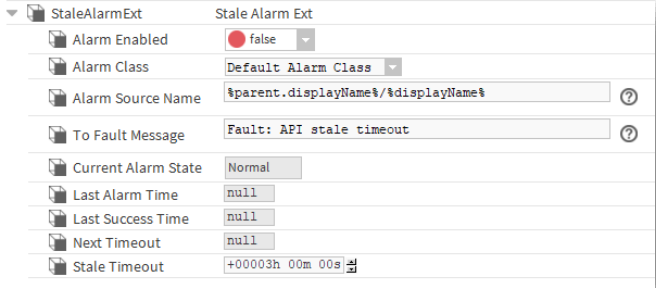
Stale Alarm Extension
The ‘StaleAlatmExt’ is available in the ‘extensions’ folder of the palette and can be dropped into an ApiRequest component to generate alarms when API request data has become stale.
The extension provides the common alarm properties so the alarm class, source name and fault message can be configured.
There is also a ‘Stale Timeout’ property.
If the parent API request component has not had a successful API request for the Stale Timeout period then an alarm will be generated.
Note that this extension will not generate alarms if API requests fail, only if a request has not succeeded for a given period of time.
If the application requires an alarm when requests fail then the ApiRequest built in alarm capability should be used.
Video Examples
Troubleshooting
HTTP Response Code 415
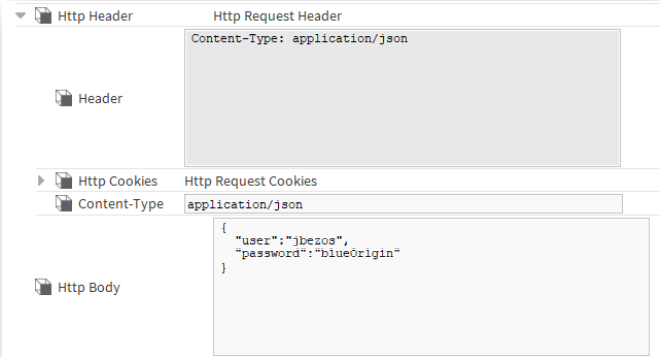
If an API request fails with a 415 response code then it is usually because the request is posting data to an API without specifying what type of data it is sending.
To fix this you should add a ‘Content-Type’ header entry.
The value of the Content-Type header entry will depend on the type of data you are sending.
If you are sending JSON data then the value should be ‘application/json’ as shown in Figure 24.
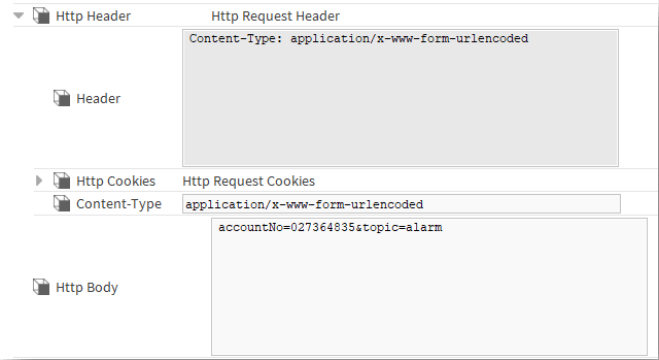
If you are instead sending URL encoded “form” data then the value should be application/x-www-form-urlencoded’ as shown in Figure 25.
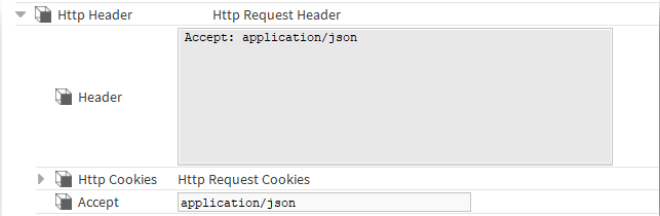
HTTP Response Code 406
If an API request fails with a 406 response code then it is usually because the API webserver requires the request to specify what type of data it wants to be sent.
To fix this you should add an ‘Accept’ header entry.
The value of the Accept header will most often be ‘application/json’ so the API will send JSON data, which OSS Easy API can easily decode. But other data types can be specified if required.
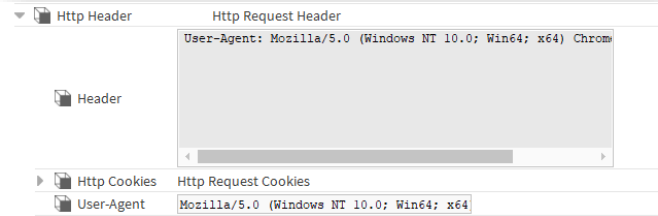
Forbidden or Bad Request
If an API request fails with a ‘Forbidden’ (403) or ‘Bad Request’ (400) response then it may be due to the API webserver requiring a special value in the ‘User-Agent’ header entry.
Some APIs require applications to specify particular details in their User-Agent data, this will usually be explained in the API authentication documentation or possibly the API terms of use description.
Sometimes it is enough for a request to just emulate a web browser for the server to accept the request, in this case the ‘User-Agent’ header entry should be set to a value that a browser might use.
For example: Mozilla/5.0 (Windows NT 10.0; Win64; x64) Chrome/91.0.4472.164
Data Tree Links Breaking
If links have been made to generated properties inside the ‘Data’ tree folder and these links are sometimes becoming disconnected, then this may be due to variations in the data that the API is returning.
For example, if an API returns JSON data with “temp”, “humidity” and “co2” fields, but occasionally does not send the “co2” (only the temp and humidity) then the Niagara property that represents the “co2” field will be deleted. So, any link to that “co2” property will become disconnected and Niagara will not reconnect the link if the “co2” field reappears.
In this situation the required data should be extracted from the returned JSON data directly using the JSON decode components, as described in ‘JSON Tools’ and ‘Using the JSON decoding tools’.
Failed Certificate Validation
If a “failed certificate validation” fault occurs then it is possible that the Certificate Authority (CA) that the API webserver is using to secure HTTPS communications is not registered in the Niagara Certificate Manager trust store.
To fix this you must first obtain the CA certificate for the API website in PEM format, contact the API provider to obtain this.
Then you must go to the platform certificate manager for the host you are running the request on.
Switch to the user trust store tab and click the import button at the bottom. Select the CA certificate PEM file for the site and import it. Once this is imported you should approve the corresponding website host in the host tab, (you may need to make another request, which will fail then return to the certificate manager host tab before you can complete the approval).
More API Guides
Here are some more guides for accessing APIs that are popular with customers: