
Updated for version 1.3.0
Introduction
This document provides instructions on how to install and use the One Sight Solutions Niagara ossEasyHistoryExport software as made available here.
ossEasyHistoryExport has been designed to overcome all of the headaches when tasked with exporting histories data from Niagara 4 such as Energy Meter data. Now you can pull as much historic data as you want from your Tridium Niagara 4 system, be it a JACE, Third Party Niagara Controller or a Supervisor, in under 10 minutes in the form of a simple multi-column CSV file.
ossEasyHistoryExport features built in options to send the exported CSV file to an FTP/SFTP server, an email address or to a standard local file.
Video demo
Requirements
It is assumed that the user is trained in the use of Niagara 4.
The ossEasyHistoryExport software is only compatible with Niagara versions 4.10 or later.
You must read the End User License Agreement before using this software.
Installing The Software
Niagara Software Module Installation
Before the OSS Easy History Export software can be used, the Niagara software modules must be installed on the user’s PC and the target host.
The following files supplied by One Sight Solutions must be installed on the host using the Niagara platform software manager:
- ossEasyHistoryExport-rt.jar
- ossEasyHistoryExport-wb.jar
These software files must also be installed in the appropriate Niagara modules directory of any PC on which you intend to access the ossEasyHistoryExport software.
Niagara Software Licensing
The host running the ossEasyHistoryExport software must be licensed by One Sight Solutions before it will operate correctly.
The following information is required to generate the ossEasyHistoryExport license:
- Niagara host identifier (e.g. Qnx-TITAN-0000-XXXX-XXXX).
- Niagara host serial number (if the host is not a supervisor).
Please send this information to One Sight Solutions: sales@onesight.solutions
It is recommended that the license is installed on the Niagara host using the platform license manager import capability to download the license directly from the Niagara license server over the internet.
If it is not possible for the host to download the license from the internet then One Sight Solutions can supply the license files necessary which can be installed manually.
Ensure that the One Sight Solutions certificate is also installed, so the Niagara platform license manager should show both of the following files:
- OneSightSolutions.license
- OneSightSolutions.certificate
The host should reboot during the license installation process.
Getting Started With ossEasyHistoryExport
This section provides a basic introduction to using the ossEasyHistoryExport software.
Once you have installed the software and restarted the station, open the ossEasyHistoryExport palette which contains the ‘MultiHistoryExport’ component.
Login to the station and drag the ‘MultiHistoryExport’ component from the palette to anywhere in the Config section of the station (or sub-folders).
Go to the new component’s property sheet view, which should look like Figure 1.
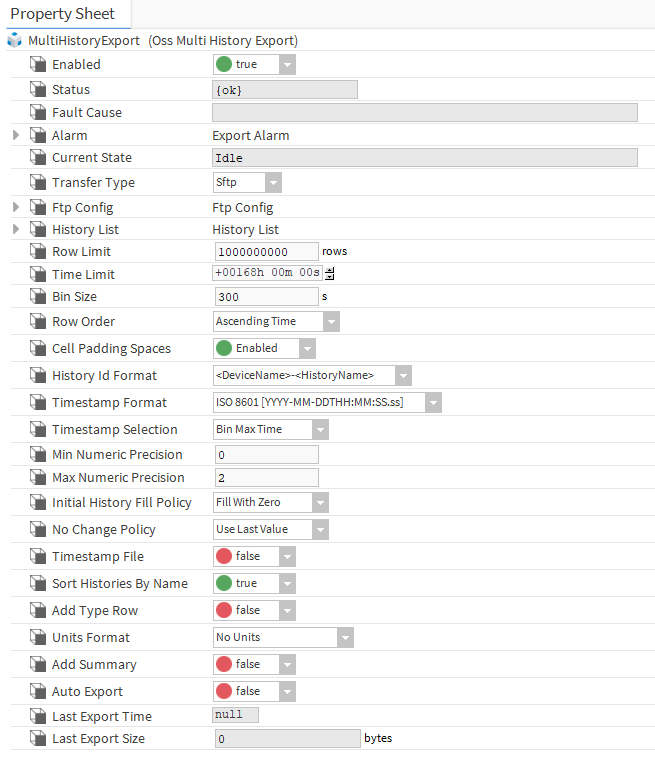
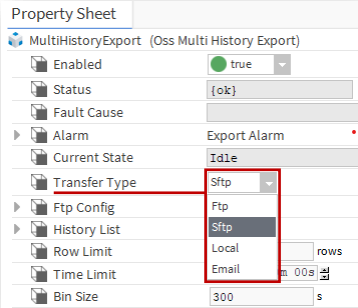
The first property to set up is the ‘Transfer Type’, which controls where the exported file is sent.
To get started it is probably easiest to set this to ‘Local’, as this will save the resulting csv file to the stations local file storage. Once you have the export working the way you want it you can then consider sending the file to a remote system by reviewing the options described in the Transfer Type section.
Then navigate to the history list by double clicking on the ‘History List’ property, which will take you to the History Selection Manger view.
In this view you can click on the ‘Find Histories’ button to obtain a list of all histories available on the station.
Select the histories you want to include in the export and add them to the history list in the lower part of the view by clicking the add button.
If you have a large number of histories on the station you can use the ‘Set Filter’ button to define a filter that can be used to restrict what histories are shown during the discovery.
Most of the other properties you can leave at the default values. These can be adjusted later to your exact requirements.
Once the export properties are configured and the histories selected you use the ‘Export’ action to generate the csv file, which should appear in the stations Files folder with the default file name of ‘history-export.csv’. You may need to refresh the tree node of the Files folder for the file to appear.
Export Tool Types
In the ossEasyHistoryExport palette there are three components.
The three tools have similar functions, the main difference is the way the exports are scheduled.
The ‘MultiHistoryExport’ tool has simpler scheduling control and is more suitable for short schedule periods (for example every hour), or if you want to trigger the export from an external source using the Export action (for example, from a Niagara schedule). This tool is described further in a later section.
The ‘AdvancedHistoryExport’ tool has more sophisticated scheduling control allowing the user to choose exports based around anchored time points, for example week, month or quarter. This tool is described further in a later section.
The ‘DailyRowHistoryExport‘ tool functions in a similar way to the other tools, but formats the output CSV into 1 day per row, with timestamps in the column headers for given intervals.
Most non-schedule properties are the same between the two tools. These common properties are described in the next section.
Common Property Reference
Transfer Type
The software provides a number of different methods for transferring the history export data, as listed in the Transfer Type property drop-down list shown in Figure 2.
These options are described in the following sections:
Also, note that when the transfer type option is changed you will need to refresh the property sheet to see the new properties sub-section that applies to that option.
FTP
If the Ftp option is used then export file is sent to a remote FTP server.
In the FTP Config sub-section an Ftp Server Address must be specified which may be an IP address or domain address.
For the Login a valid username and password must be provided for an account on the remote server.
The Ftp Port property should already be set to the default value for the transfer type, but the server you are connecting to may be configured with a different value. Contact the administrator of the server if you are unsure if this value is correct or if you get a connection refused error.
Enter the name of the file that will be created on the destination server into the Remote Path property. This file will be overwritten if it already exists. The path may contain folders using the forward slash (‘/’) separator, but the folders must already exist (they will not be created). No extension will be added, so any required extension should be included in the name.
The Timeout property can be left as the default, but may need to be increased if you are using very slow connections (e.g. 3G mobile).
Note that FTP transfers are insecure and all data is sent over the interconnecting network unencrypted.
SFTP
If the Sftp option is used then export file is sent to a remote SFTP server.
The SFTP server options are the same as for the FTP option above (except these now apply to a SFTP server).
Note that a SFTP server is completely different from an FTP server. Contact the administrator of the server if you are unsure which type to use.
Also, note that SFTP servers are different from FTPS servers and do not interoperate. It is currently not possible to send exports to an FTPS server with OSS Easy History Export.
Local
If the Local option is used then the export file will be saved to the stations local file system.
The default file name is ‘history-export.csv’ which can be changed by updating the ‘Local File Path’ property in the Local Config sub-section.
Note that the Local File Path property is a ‘BFormat’ string, which allows property values from the export tool to be included in the text. Please refer to the Niagara documentation for a further explanation of this feature.
If the email option is used then the export file will be sent as an attachment to an email.
An email account must have already been set up in the Niagara email service and properties are available to allow the email subject, recipients, body and attachment name to be customised.
History List
The History List specifies the histories that will be included in the export.
Click on the ‘History List’ property to view the History Selection Manager.
Click on the ‘Find Histories’ button at the bottom of the window to discover the histories available in the station.
The required histories can be added to the station database using the usual methods of dragging, double-click or select and add button.
The histories will appear in the export in the order that they are in the history list unless the Sort Histories By Name option is set to true.
You can also use the ‘Set Filter’ button to define a filter to limit which histories are shown during the discovery.
Bin Size
The Bin Size property controls how different histories are combined into a single row in the CSV file.
This property defines a time period. All the histories that change within the same time period will be included in the same row. All the histories that have not changed in that period will have their cell filled according to the No Change Policy property.
If all histories change at approximately the same time then the bin size just needs to account for any small variations in the time so all histories can be combined into the same row.
If many of the histories change at different times then a larger bin size period will mean more histories will be combined into the same row, but the exact value change timestamp will be less accurate for some histories. A smaller bin size period will mean more rows, but more accurate timestamps.
Row Order
The Row Order property defines if the rows are listed in the exported CSV in ascending time order or descending time order.
Cell Padding Spaces
If the Cell Padding Spaces options is true then extra non-essential spaces will be added after cell values to aid human readability. Set this to false to remove these spaces to reduce the size of the export file.
History Id Format
This History Id Format property controls the format of the export CSV column names.
There are options of include the device name (usually station name) followed by the history name, or just use the history name by itself, or to use the history display name which is usually easier to customise.
Timestamp Format
The Timestamp Format property defines how the time column of the CSV is formatted. The Epoch Milliseconds format will use a single number indicating the number of milliseconds since January 1, 1970 midnight GMT. The Niagara platform format uses whatever the default time format is defined for the Niagara platform (which is locale specific). Other formats show how the time will be formatted as part of the selection list.
Timestamp Selection
Each CSV row contains history values that occur within a short time period: the sample ‘bin’ (as defined in the ‘Bin Size’ property).
The Timestamp Selection property defines how the timestamp value for each CSV row is chosen from this sample bin time period.
The options allow for setting the row timestamp time to the maximum time of any history value included in the row, the minimum time of any history or the ‘mode’ time of all histories.
Using the ‘mode’ selection will mean that the most common time of all history values included in the row will be used. This is useful if a few of the history entries have times that are slightly offset from the usual history record time, which otherwise may mean that the row time will deviate slightly from the expected aligned time.
Min Numeric Precision
The Min Numeric Precision property defines the minimum number of numeric digits that will be placed after the decimal point for numeric history values.
Max Numeric Precision
The Max Numeric Precision property defines the maximum number of numeric digits that will be placed after the decimal point for history values, (values will be rounded if they exceed this).
Initial History Fill Policy
The Initial History Fill Policy property defines what is placed in CSV cells when one or more histories start later than others and therefore do not have values for the first rows of the export. Various fill values are provided (zero, NaN, null or empty). Or if the ‘Truncate’ option is selected then the CSV will only start when all histories have valid values (or one of the limit properties is exceeded).
No Change Policy
The No Change Policy determines the contents of export cells when there is no new history record for the CSV row time period for a particular history.
The options are to fill the cells with the last history value, with a ‘null’ text value or to leave the cell empty.
Timestamp File
If the Timestamp File property is set to true then a timestamp will be added to the destination CSV file name.
This time-stamp text will take the format: YYYY-MM-DD-HH-MM-SS.
If the export file name contains an extension then the timestamp text will be placed before this extension, (i.e. before the last ‘.’ character in the text).
If the Timestamp File property is set to false then the CSV file name will be exactly the value specified in the transfer configuration property and each export will overwrite the previous file.
Sort Histories By Name
If the Sort Histories By Name property is set to true then the export CSV histories columns will be ordered so the history names are alphabetically sorted.
If this property is false then the column order will be the same as found in the history list.
Add Type Row
If the Add Type Row property is set to true then the export CSV will include a row after the column name row that will indicate the type of the data in the column.
If this property is false then no type row will be added.
Units Format
The Units Format property defines what information about the history units is included in the export and where it is placed.
The options are described in Table 1.
| Option Name | Description |
| No Units | No history units will be included in the export. |
| Units Row Symbol | A separate row will be added including the units symbol. |
| Units Row Text | A separate row will be added including the units as text. |
| Units Name Symbol | The units symbol will be added in brackets after the history name. |
| Units Name Text | The units will be added in brackets after the history name as text. |
Add Summary
If the Add Summary property is set to true then a summary section is added to the end of the export CSV that contains the start value, end value and difference for each numeric history.
MultiHistoryExport Tool
The MultiHistoryExport tool has basic scheduling capabilities suitable for hourly or externally triggered exports.
The tool has an ‘Export’ action that allows external components such as Niagara schedules to trigger an export.
There is also an auto-export capability.
If the ‘Auto Export’ property is set to true (and the property sheet is refreshed) then you will see an ‘Update Period’ property which will dictate how often an automatic export is run.
The size of the export CSV file can be controlled using the ‘Row Limit’ property or the ‘Time Limit’ property.
Whichever limit is reached first will stop any more rows being added to the CSV file (working from the latest values backwards in time).
The Time Limit is measured from the time the export is executed.
All other properties are as described in the common properties section.
AdvancedHistoryExport Tool
The AdvancedHistoryExport tool has more advanced scheduling capabilities allowing exports to be generated on a daily, weekly, monthly or quarterly basis, as well as custom or externally triggered options.
The ‘Export Schedule’ property controls how often the export is generated. This can be Daily, Weekly, Monthly Quarterly, Manual or Custom.
If the Manual option is selected then an export will only be generated when the ‘Export’ action is run.
If the Weekly option is selected (and the property sheet is refreshed) then you will see a ‘Start Of Week’ property which dictates which day of the week the export will be run.
If the Monthly option is selected (and the property sheet is refreshed) then you will see a ‘Export Day Of Month’ property which dictates which day of the month the export will be run.
If the Custom option is selected (and the property sheet is refreshed) then you will see a ‘Custom Time Period’ property which dictates how often an export is generated.
All exports times are anchored around midnight (00:00), but the ‘Export Schedule Delay’ property allow you to delay the export until some time after midnight (for example 5 AM). This delay applies regardless of the Export Schedule selection.
The ‘Export Range’ property controls how much data is included in the export. There are options for Day, Week, Month, Quarter, Year and Custom.
If the Custom option is selected (and the property sheet is refreshed) then you will see a ‘Custom Time Range’ property that allows you to define a specific, fixed time range.
The ‘End Time Offset’ property allows you to exclude some of the most recent history data from the export. This may because there could be delays to some history values being recorded, so including all latest data would generate inconsistent results compared to the next export when the final records have been included. If you are not sure if this offset is required then it is best to use the default zero offset.
The ’Max Export Size’ property is used to limit the size of the final export file.
This can ensure that the export is not too large for system limitations. For example email servers may have limits on the maximum size of attachments.
All other properties are as described in the common properties section.
DailyRowHistoryExport
The DailyRowHistoryExport tool exports histories into CSV files with days separated by row, and timestamps along the column headers.
The ‘Export Schedule Period‘ property determines how often the tool exports the histories.
The ‘Export Range‘ property determines how far back the history should be exported (with the default 168h being the 7 previous days).
‘Reading Interval‘ determines how often a data reading is taken from the history, and will be reflected in the timestamps of the output.
‘History name Selection‘ gives the choice between the default name of the history (determined upon history creation), the display name of the history, or the name given to the history within the list of discovered histories.
All other properties are as described in the common properties section.