
Updated for version 1.2.3
Introduction
The One Sightsolutions FTP Service ossFTP provides a way to push a file, or the contents of a directory from your Niagara station file system to an external FTP/SFTP server. It is compatible with controllers running Niagara 4 such as the JACE 8000, as well as a Niagara 4 Supervisor.
The transfer can be scheduled to run regularly at set times if required, for instance in the case of needing to transfer a weekly report that is generated on a JACE.
Because the JACE initiates the FTP connection there is no need to leave ports open on the JACE, meaning security is not compromised to achieve the file transfer.
Requirements
It is assumed that the user is trained in the use of Niagara 4 and is familiar with the use of FTP services.
The ossFTP software is only compatible with Niagara versions 4.7 or later.
You must read the End User License Agreement before using this software.
Installation
Niagara Software Module Installation
Before the ossFTP software can be used the Niagara software modules must be installed on the user’s PC and the target host.
The ‘ossFTP-rt.jar’ file supplied by One Sight Solutions must be installed on the host using the Niagara platform software manager. This host must then be rebooted.
This software file must also be installed in the appropriate Niagara modules directory of any PC on which you intend to access the ossFTP software. The PC Niagara software should then be restarted.
Niagara Software Licensing
The host running the ossFTP software must be licensed by One Sight Solutions before it will operate correctly.
The following information is required to generate the ossFTP license:
• Niagara host identifier (e.g. Qnx-TITAN-0000-XXXX-XXXX).
• Niagara host serial number.
Please send this information to One Sight Solutions: info@onesight.solutions
It is recommended that the license is installed on the Niagara host using the platform license manager import capability to download the license directly from the Niagara license server over the internet.
If it is not possible for the host to download the license from the internet then One Sight Solutions can supply the license files necessary which can be installed manually.
Ensure that the One Sight Solutions certificate is also installed, so the Niagara platform license manager should show both of the following files:
• OneSightSolutions.license
• OneSightSolutions.certificate
The host should reboot during the license installation process.
Installing The FTP Service
To use this software to transfer files you will first need to install the FTP service.
Open the ossFTP palette in Workbench, as shown in Figure 1.
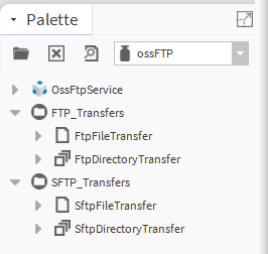
Inside you will find the FTP Service, and two folders containing the file transfer and directory transfer components for the FTP and SFTP protocols (these can also be accessed from the FTP service Action menu).
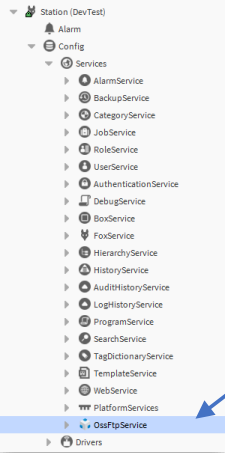
Drag the OssFtpService component from the palette onto the Services container of your Niagara station, as shown in Figure 2.
Transfer Selection
There are four types of transfers available.
These are grouped according to what type of FTP server they can talk to: FTP or SFTP.
The main difference is that SFTP transfers use secure communications, so are the preferred method.
But the type you choose will depend on the capabilities of the server you intend to transfer data to.
You should check with the server administrator to find out what options are available.
For each server type there are both file and directory transfer options.
As you may expect the file transfer option will only transfer a single file and the directory transfer option will transfer a whole directory of files.
You can drag the chosen transfer type from the ossFTP palette, but the transfer must be dropped in the OssFtpService component in the services folder.
Alternatively, you can add a transfer using the OssFtpService action menu as shown in Figure 3.
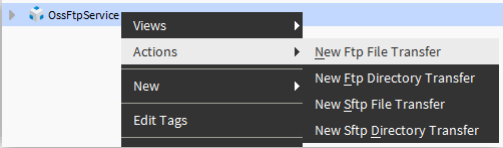
More than one transfer may be added to the OssFtpService and any combination of the available types may be used simultaneously.
Configuring The FTP Service To Make Transfers
Specify source and destination
Specifying a source file
If you are using a File Transfer then you will need to specify the source file.
The ORD path of the file must be entered in the ‘File To Transfer’ property.
The easiest way to do this is to use the File Ord Chooser from the drop-down menu that is available to the right of the ‘File To Transfer’ text field. See Figure 4.
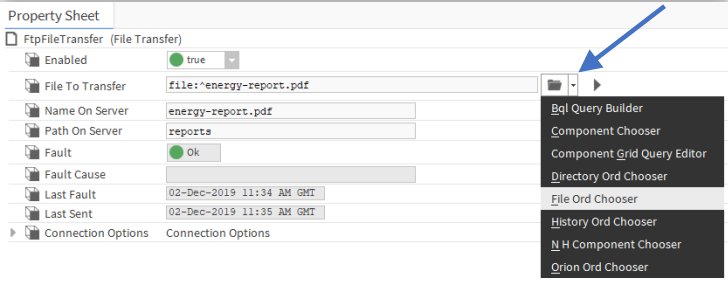
Once the file to transfer has been entered and saved the ‘Name On Server’ property will be automatically updated to reflect the name of the source file. This property can be changed to specify the file name that will be used on the remote server.
The ‘Path On Server’ property defines the directory that the file will be saved to on the remote server. This directory must already exist on the remote server or the transfer will fail.
The forward slash (‘/’) character should be used as a separator in source and destination paths, not the normal Windows back slash (’\’), (in the same way that it is used in Niagara Ords).
Specifying a source directory
If you are using a Directory Transfer then you will need to specify the source directory.
The ORD path of the directory must be entered in the ‘Directory To Transfer’ property.
The easiest way to do this is to use the Directory Ord Chooser from the drop-down menu that is available to the right of the ‘File To Transfer’ text field. This is similar to using the file Ord chooser, see Figure 4.
The ‘Path On Server’ property defines the parent directory that the directory files will be saved to on the remote server. This directory must already exist on the remote server or the transfer will fail.
Note that the directory specified in the ‘Directory To Transfer’ path will not be created on the remote server, only the files contained in the directory.
The forward slash (‘/’) character should be used as a separator in source and destination paths, not the normal Windows back slash (’\’), (in the same way that it is used in Niagara Ords).
Specifying connection parameters
You must specify the connection parameters for the remote FTP or SFTP server in the ‘Connection Options’ section.
The ‘Ftp Server’ property must contain the address of the FTP or SFTP server. This can be an IP address or domain name (if the station DNS has been set up).
The ‘Port’ property contains the IP port that the FTP/SFTP service is running on. The port values are set to the default values for each server type, so usually will not need to be changed. If you have problems connecting to the server you should verify the port number is correct with the system administrator of the remote server.
The ‘Timeout Delay’ property specifies how long the software will wait to connect or write data to the remote server before failing. Usually the default value will work without problems, but some types of connection with high latencies (e.g. 3G mobile) may cause timeouts so this value may need to be increased.
The FTP ‘Use Passive Mode’ option should be left as the default option unless advised otherwise by the administrator of the remote server, (SFTP transfers do not have this option).
The ‘Server Credentials’ should be set to the user and password of the FTP/SFTP remote server logins being used to transfer the files.
Transferring Files
To transfer the files or directories use the ‘Transfer File’ action on the transfer component.
If you have multiple transfers set up then these can be run independently, at the same time.
For guidance on scheduling periodic transfers refer to ‘Scheduling Regular Transfers’.
If a transfer fails with an Access Denied fault then refer to the file location restrictions described in ‘Allowed File Locations’.
Allowed File Locations
The Niagara 4 Security Manager has introduced restrictions on which parts of the file system are accessible to users and made major changes to how Niagara uses the file system. For a JACE this means the file to be transferred will need to be stored in the ‘Files’ section of the file system.
Important – On a PC, the required location of the files you wish to transfer will depend on how you have started your station. Stations that have been started using Application Director have different file access permissions to those started from a command line.
If you are running your stations from Application Director you will need to place the files that you want to transfer in Station Home, which will be similar to:
C:\ProgramData\Niagara4.7\tridium\stations\myStation\shared
Note that the ProgramData folder is a hidden folder by default on Microsoft Windows, so you will not see it unless you change your view options to show hidden files and folders. If the station was started using the command-line then what Niagara considers the home directory will be different. In this case the Station Home directory will be something like:
C:\Users\\Niagara4.7\tridium\shared
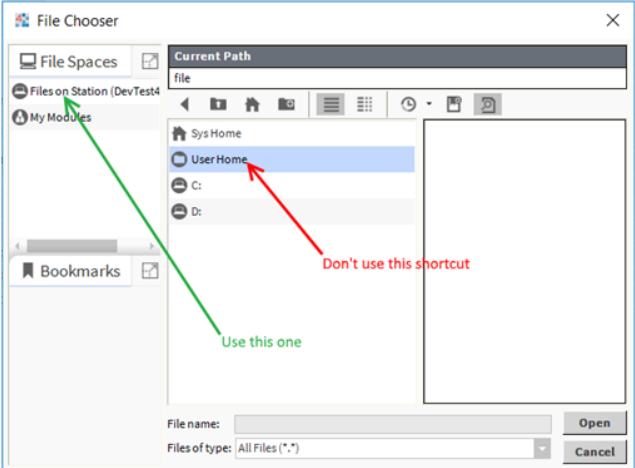
Avoiding A Known Bug With The Tridium File Ord Chooser
At the time of writing there is a confusing quirk with how the Tridium File Ord chooser operates which you will need to avoid, which is easy as long as you know that it exists.
When picking a file to transfer from Station Home make sure to use the shortcut on the top left.
Although station home is found inside user home, user home is evaluated incorrectly by the Ord chooser and may point you to C:\Users\Username\Niagara4.7\tridium, which confusingly also contains a shared folder.
Any ‘file not found’ faults are likely to be a result of this issue and can be avoided by using the correct shortcut.
Scheduling Regular Transfers
In order to provide maximum flexibility, the OssFtpService relies on using existing Niagara schedules to trigger the transfer action.
Any Niagara component with a topic slot could be used to trigger a transfer, but for most purposes the Trigger Schedule will be used.
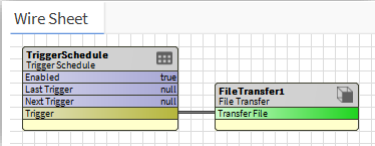
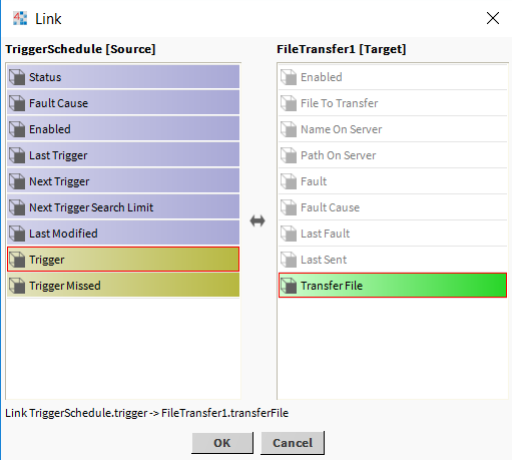
Drag and drop a Trigger Schedule from the Niagara Schedules Palette somewhere into your station.
Set up your event(s) in the Trigger Schedule, then link from the trigger topic slot on the schedule to the Transfer File action slot on the file transfer component.
ossFileClear Tool
The ‘OssFileClear’ tool is available in the ossFTP palette for managing file space in the Niagara station.
The tool deletes files that are older than a specified time period to ensure that files generated by an application do not fill up the station file system after they have been transferred to another system.
The tool can be dragged from the palette to anywhere in the station config folder, or sub-folders. For example, it can be placed in the OssFtpService alongside the transfer components.
The tool has a number of properties that control what files are deleted.
The ‘Folder Path’ property defines the root folder in the station file system where files will be deleted. No files outside this folder will be deleted (but files in sub-folders may be deleted, depending on other settings).
The ‘File Suffix’ property defines a portion of text. If a files name ends with this text then it will be considered for deletion. Any files with names that do not end with this text will not be deleted. This property is designed for specifying the file extension of the type of file you wish to be deleted, for example a value of ‘.csv’ will mean that only csv files will be deleted. Leaving the property empty will mean that any file could be deleted.
The ‘Retain Limit Days’ property defines how old files must be before they are deleted. The property specifies the time limit in days. All appropriate files that are more than the specified number of days old are deleted.
The ‘Clear Sub Folders’ property controls whether the tool will also delete old files from sub-folders of the folder defined in the ‘Folder Path’ property. If set to false then no sub-folders will be checked.
The other tool properties provide information about the files have been deleted when the tool was last activated.
To activate the tool run the ‘Clear Files’ action.
This action can be linked to a schedule to ensure old, unwanted files are deleted at regular intervals.